
Queen cells are the unsung heroes of sustainable beekeeping. Most beekeepers still seek out mated queens for splits and replacements when queen cells work just as well or even better. There are many advantages to using queen cells over mated queens. A huge advantage is seen in the spring, as queen cells are available earlier in the season. By definition, they are ready weeks before mated queens. For those of us in the north, a week can make all of the difference in making splits for swarm control. Where I live in Michigan, winter tends to hang on as long as it can, and then instantly and dramatically flip a switch to summer. During the cold spring, it is difficult to maintain nucs and have good weather for mating, so it is almost impossible for me to have mated queens ready by the time I want to make splits for swarm control. I can however, make a big cell starter and have enough queen cells ready for all my splits before the weather turns.
The second benefit is that queen cells are significantly cheaper. This economic advantage is really important when we are looking to replace large numbers of older queens, or if we don’t have good success in introducing queens (many beekeepers throw money away on mated queens that aren’t accepted). Canadian researchers looked at the economics of queen rearing, and found that queen cells cost the producers between $2 and $5 per cell, while mated queens cost from about $10 to over $25 to produce (Bixby 2020). From the producer side, the difference in labor is enormous. I can raise 90 cells from just two or three hives — I just need a strong starter and a hive with a good queen and graftable larvae. I will have 90 cells in just over a week. If I want 90 mated queens, I need to manage well over 100 mating nucs, which require multiple hives to start, and I have to feed and maintain them for a month.
Many times when I suggest using a queen cell rather than a mated queen, I am met with an objection — “Won’t that cause too much of a brood break?” While using a queen cell will indeed cause a brood break, this is considered an advantage in my book, and not a concern. In the era of varroa, we have to have a season-long management strategy. A brood break is a lovely and effective part of this strategy, because it creates a period where varroa cannot reproduce and when the mites are vulnerable to grooming or at risk of leaving the hive on a forager. We can even increase the effect on varroa control by adding in an oxalic acid treatment while the colony is broodless. Even better, a well-timed brood break can actually increase honey production. A broodless period means that there are fewer young mouths to feed, and more bees are available to gather and process nectar for honey. Nectar flow brood breaks have long been a technique used by comb honey producers to maximize honey production during a strong flow.
Another advantage to using queen cells is that they are often more available locally. As mentioned above, they are easier and cheaper to produce, and can be made earlier in the season. This means that many smaller-scale beekeepers that would not be able to maintain a large apiary of mating nucs for queens will be able to produce cells for beekeepers in their club. Not only will you have bees from a colony that thrived in your area, with similar nectar flows and weather, but you will also not have to worry about the stress of transport. Shipping can be incredibly damaging to queens; heat loss during transport has been linked to low sperm viability, which can affect overall colony performance (Pettis et al. 2016, McAfee et al. 2020). If you are going to spend the money and time on replacing a queen and you are going to count on her production over the next year, you want to make sure that she is in excellent health.
The final advantage to queen cell use is the high rate of acceptance. Many beekeepers struggle to introduce mated queens in hives, especially when colonies are larger, or conditions are not ideal. When a virgin emerges in a queenless colony, there is no concern about introduction. The bees will accept her as she comes out of a cell as a young virgin, and you do not have to mess around with push-in cages and candy plugs.
There are some downsides to using queen cells. First and foremost, when using a queen cell, you’ll only get half of the genetics of the original colony. The drone part of the equation will come from wherever you are located. This may be a positive thing, if you have lots of good, overwintered colonies thriving in your area, or it may be less than ideal if you don’t know the genetics of the bees that are around. The other downside to using queen cells is that you have to account for some of the virgins not returning from their mating flights. This isn’t the end of the world, but you’ll have to prepare for it by making an extra split or two, and planning on combining those that fail.
There are multiple advantages to using queen cells instead of mated queens. In my operation, I use them for spring splits, for making up nucs to overwinter, and to requeen old and failing colonies. It is an excellent practice to make up a few nucs with some queen cells to learn the process, and to have them on hand to support or replace your other colonies.
How to use queen cells
Queen cells are just as easy to use as mated queens, if not easier. They are easy to transport and install. However, there are considerations to their timing, transport, and introduction that will allow you to have the best success.
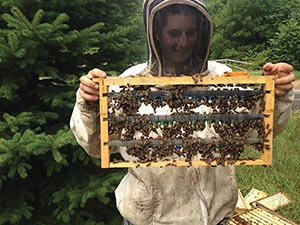
Timing. Queen cells vary in their hardiness depending on where the virgin is in her development. A larva sitting on a pool of royal jelly in an open cell is pretty hardy to temperature changes, but is vulnerable to drying out or being shaken off the food. A queen that is mid-pupation, just forming her wings, is very delicate, and even a few shakes or short period at the wrong temperature can have life-long consequences. A completely ripe cell that is just about to emerge will be just as hardy as a virgin, and can handle a few more knocks and swings in temperature. I will sell queens at a few times in their development, at days I feel are safe for transport: as young as 72 hours old, the day they are capped, and right before emergence. I try not to sell or transport queen cells when they are in their sensitive development phase, to reduce the chance of harm to the developing queen.
It is important to know how old the cells are (the day they are grafted) so that you can know the best way to transport them. Younger, uncapped cells transport best in a queenless nuc with bees to tend to them, but can travel short distances in a container as long as they aren’t jostled heavily and don’t dry out. Usually if I have to transport open queen cells, I’ll create a nuc with nurse bees — it doesn’t have to be full, but you want enough bees to cover and care for the cells. For short distances, I’ve had success putting the cell into a Styrofoam cup, and covering the cup with a wet paper towel.
There are many ways to safely transport capped queen cells. You can purchase a commercial incubator, but they are quite expensive, and in most cases not worth the cost. If you are traveling a long distance, you can make an incubator out of materials that you have at home. Basically, you want the cells to be warm, upright, and cushioned from bumps on the road. A really nice method is to use a small cooler with a bottle of hot water at the bottom, that is covered by a thick layer of sawdust or pine shavings. The cells can be nestled into the sawdust and will remain stable and warm for hours. Shorter distances are even less concerning, especially on warm days. A transport container can be as simple as some toilet paper in an egg carton. I have one beekeeper who buys queen cells from me every year, and every year he will take them home by wrapping a piece of paper around the cell like a tube, and sticking it into the chest pocket of his shirt. Often, if customers don’t bring anything for transport I’ll grab a container from the ….