Naturally-built queen cells, occurring from swarming or queen supersedure, can be used to rear new queens. When naturally-built queen cells are not available, or when we want them at certain times, we can use the Miller queen rearing method.
Dr. C.C. Miller of Marengo, Illinois, devised this method of queen rearing (see Figure 1). He shared this method with his fellow beekeepers by publishing it in the August 1912 issue of the American Bee Journal (see Figure 2). Over the years, several versions of Miller’s queen rearing method have appeared. I describe here the Miller method in slightly different versions, showing the method’s versatility for beekeepers to customize the process to their situations. Where appropriate, I include some suggestions that should make the procedure easier. When using the Miller method, I typically get about 6-12 usable queen cells. Thus, the Miller method would be particularly useful for beekeepers with roughly 10-25 colonies. In addition, the Miller queen-rearing method happens to be quite well adapted to top-bar hives.
The Miller method requires the following bees and equipment:
- breeder colony
- (queen) cell-building colony
- brood (deep) frame and unwired foundation, or a top bar and unwired foundation, or a top bar with a new comb about half full size
- several mating nucs (optional in some versions)
First, choose a breeder colony that will serve as a source of new queens. The breeder colony should have the characteristics that the beekeeper wants to reproduce in other colonies. Some of these characteristics would include superior honey production, reliable wintering ability, gentleness, early colony buildup, and varroa mite tolerance/resistance.
As shown in Dr. Miller’s original picture, Figure 2, the queen cells grow from the edges of combs, which is our goal. I list below the steps to the Miller method. Because some of the procedure may seem a bit curious, I have also included the bee biology showing how the Miller method works.
- Dr. Miller was a consummate beekeeper, producing tons of section comb honey in eight-frame hives (our standard frame size). He attached long foundation strips a few inches wide, ending in triangular points a couple inches above the bottom bar of the frame. He knew how to handle the resulting delicate combs. Just starting out, here are some options.
Attach a sheet of unwired worker cell-size foundation in a deep brood frame. If possible, use a deep width of foundation because later on it will make the procedure simpler. Although it will be slightly more complicated later on in the procedure, one can also start with a deep brood frame fitted with a sheet of unwired worker-size foundation that would normally be used in a super frame. Unwired brood foundation, being a bit thicker and stronger, holds up against the handling better, during the subsequent steps, when compared to the thinner foundation for supers. If only super foundation is available, then use and be careful.
Some traditional descriptions of the Miller method start with foundation cut in triangles as shown in Figure 3, which is perfectly fine for starting out. The resulting combs will not be as long as Dr. Miller’s original combs. Being shorter they should not be as delicate, and are more forgiving with handling mistakes. Because the deep brood frame is taller than the super-width foundation, the foundation of course does not completely fill the frame; this is not detrimental to the procedure. (However, if you start with a deep brood frame and super-width foundation, be sure to see my cautionary statements at step three concerning drone comb along the edge of the trimmed comb triangles.)
Anticipating that the queen cells will be produced on this deep brood frame with unwired foundation, let’s call it the queen-rearing frame. The queen-rearing frame should have NO comb-reinforcing wires, i.e., no straight horizontal wires and no crimped vertical wires. Later in the procedure, these wires could impede the removal of the queen cells from the comb. Without the reinforcing wires, the foundation and resulting comb in the queen-rearing frame will be fairly delicate. As you handle the queen-rearing frame, hold it vertically and resist the temptation to tilt it as is routinely done when inspecting other brood frames. Tilting the queen-rearing frame may cause its foundation or new comb to bend, or tear off. From decades of experience as a top-bar-hive and frame-hive beekeeper, I know tilting frames becomes essentially a reflex for frame-hive beekeepers. (Tilting top-bar combs is a bad practice because it breaks combs.) In a moment of distraction, tilting can damage the combs in the queen-rearing frame. Frame-hive beekeepers, do not scold yourself if some combs or queen cells become damaged this way. Tilting frames was built deep into your training.
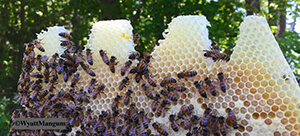
Top-bar beekeepers should just attach foundation triangles to a top bar with melted wax in the usual manner as described in detail in my top-bar hive book “Top-Bar Hive Beekeeping: Wisdom and Pleasure Combined.” The result would resemble the triangular configuration in Figure 3, but just with a top bar. A top-bar beekeeper could also save about half-built combs in worker cells that have never had brood cocoons in them to become queen-rearing combs (combs, no frames in top-bar-hive beekeeping). See Figure 4. With new wax, absent brood rearing and cocoons, the bees have an easier task to remodel the worker cells into queen cells.
- Put the queen-rearing frame in the brood nest of the breeder colony (see Figure 5). In two days, briefly inspect the queen-rearing frame for comb construction and to see if conditions call for adjustments. In no more than four days, examine the queen-rearing frame. (Three days for the expected egg hatch and a day for some comb construction.) Look for the presence of eggs or possibly young larvae that are about the size of eggs. This brood is young enough to form normal queens. When this young brood is distributed across the comb, the bees have properly prepared the queen-rearing frame for step number three.
Sometimes by the fourth day, the bees have not finished preparing the queen-rearing frame: The comb construction is slow; the egg occupancy is incomplete, forcing the beekeeper to inspect the cells later. When I find the bees have not finished preparing the queen-rearing frame, I typically recheck it in one or two days, depending on what was present on the first inspection. However, do not wait too long to recheck the queen-rearing frame, because if the larvae get too large (i.e., larger than about the size of an egg), then they are too old for queen rearing. If you find older/larger larvae on a subsequent recheck, just start over and recheck the queen-rearing frame more frequently.
Unripened honey could fill the new comb in the queen-rearing frame, and the queen lays eggs elsewhere. Having too much unripened honey in the queen-rearing frame can easily happen during a heavy spring nectar flow. The bees can be made to remove this unripened honey by slowing the breeder colony’s rate of nectar collection. To slow the nectar collection, remove the breeder colony’s field bees by moving the breeder colony to another location within the apiary. Place another colony (a queenless nuc) at the former location of the breeder colony to catch its incoming field bees. The temporary loss of the breeder colony’s field bees decreases the amount of incoming nectar. With less nectar coming into the colony, the bees should move the unripened honey from the queen-rearing frame because it resides in the brood nest, provided storage comb space is above the brood nest. (Leaving a thin upper rim of cells with unripe honey is normal; lower on the comb is not.) In turn, the queen will have room to lay her eggs in the recently vacated comb. When encouraging the bees to move unripened honey from the queen-rearing frame, I leave this frame in the breeder colony after relocating the colony. Then I wait for the bees to move the nectar from the queen-rearing frame by checking it every couple of days until eggs or very young larvae appear.
Sometimes the bees are slow in producing wax and constructing the comb on the queen-rearing frame, as in a summer dearth. To stimulate comb construction, feed the breeder colony sugar syrup (1:1 sugar:water). Even when feeding sugar syrup, the queen may still prefer laying eggs in the dark brood combs adjacent to the newly constructed light comb. Hopefully continued feeding will tempt the bees and the queen to utilize the queen-rearing frame as part of their brood nest. Check the queen-rearing frame every couple of days until eggs or very young larvae appear. (Understand that a dearth is a difficult time to rear queens without considerable intervention at every step because nature is not helping.)
Dr. Miller reported a way to force the breeder colony to build out the foundation and secure the required brood age. He removed all the brood combs from the breeder colony except for two. Between them, he placed the queen-rearing frame. In addition, when the bees expand the combs off the foundation, they will build worker cells, not drone cells, avoiding a small complication coming in the next step.
While I consider this manipulation valuable in some situations, for modern apiculture consider these two caveats. A double brood chamber hive (deep supers, usually with ten frames each) with the bees managed for liquid honey, would have a considerable number of brood frames to disperse, either temporarily or permanently. (That would be compared to an eight-frame comb-honey hive. Its small brood nest is meant to force the bees up into the comb honey sections.)
Protecting the displaced brood combs in other colonies could pose a logistical difficulty. The recipient bees must cover the combs even during cool spring nights, obviously so the brood could survive. Perhaps less well appreciated, bees in sufficient numbers must also patrol and guard the combs against small hive beetle invasion, particularly when the weather is warm. Recipient colonies must not have to cover too many displaced brood combs at once. Adult small hive beetles could gain access to some spots in the pollen bands. If so, eventually they could destroy the recipient colony. Of course the displaced brood combs could be used to strengthen existing nucs (one per nuc), the boost being factored into their growth plan. With this plan, the displaced brood combs become “spread out” so much that no single colony is over burdened.
Here is the next concern. What replaces the displaced brood frames in the fixed comb space of the breeder hive? Frames of foundation or comb? Foundation would compete with the comb construction at the queen-rearing frame. Using empty combs would attract the queen away from the queen-rearing frame to large comb areas. My choice would be foundation. The queen-rearing frame would hopefully receive enough attention in a strong colony.
A top-bar hive breeder colony does not present a problem because its comb space is not fixed. The queen-rearing frame, flanked by its two brood combs, could go two top-bar widths from the entrance end of the hive. Next to the entrance an empty half-built drone comb acts as buffer. The bees refrain from using this comb, unless the hive becomes excessively crowded. Next to the drone comb goes a comb with wide pollen bands on both sides. On the other side of the reduced-sized brood nest goes another ….