
Making a few queens for the hobby beekeepers can be a simple affair. It was the original intent of this column to use a method that has been in use since the invention of the movable frame hive by Langstroth in 1850. Now there is another method developed that may be easier and better.
Why would a hobby beekeeper want to make a dozen queens? You can take a queen cell from your chosen queen-producing colony and place that queen cell into a hive body with a frame or two of brood and adhering bees. That nucleus colony will grow rapidly. New queens are now $25 each and up. The queens are more expensive than ever. Making a few queens is not difficult.
I am not talking about grafting, using queen cell bank frames or using plastic cell cups. It is necessary to use queen-rearing equipment if you wish to commercially produce queens for sale. However, making a dozen queens for your own use can be done more easily. Keep in mind that a dozen is about all you will get and that is hardly enough to build a queen-rearing business.
A strong colony is needed to produce queens. Bees have a natural tendency to produce queens in the spring. This is best time to stimulate queen production. That colony which is getting strong and likely to swarm is the best choice. To induce queen rearing, you must first remove the queen in the chosen strong colony. Remove her and one frame of capped brood covered with bees. Place this frame into a colony for making a nucleus. If you have a second strong colony, it is best to shake the bees off another frame of capped brood and add this to the nucleus colony you will make. Two frames of brood, a queen and a frame or two of honey will grow faster than any package of bees in the mail. You can make up this nucleus and expect it to make a strong colony that year. It will likely produce honey surplus in the first year, especially if fed protein patties.
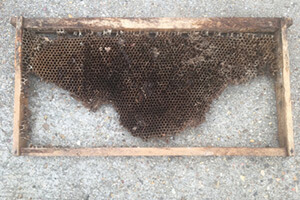
Once you remove the queen and bees, look for a frame with eggs and just-hatching larvae. This frame must have been loaded with beeswax foundation. For reasons that will soon become obvious, plastic foundation does not work. Find the parabolic curve in that frame where eggs are just below newly hatching larvae. Cut the wax comb completely through and remove the lower portion of the comb where the eggs are. Yes, we are sacrificing newly laid eggs for the good of our new queens to be.
If you feel sorrow about sacrificing the eggs, you can save them. Place them into a brood frame with beeswax foundation. Cut out the wax foundation to match the size of the pieces with brood eggs. Use string and nails. Tap the nails into the top bar and bottom bar to hold the string. Nails must be on both sides of the top and bottom bar. Zigzag the string to the nails making a fence to hold the loose brood comb eggs into the frame. You can put this in your nucleus colony and let the bees wax in everything and tend to the eggs as they hatch.
Meanwhile, back in the queen-producing colony, your newly hatched larvae should be neatly lined up at the bottom of the cut brood comb. These larvae will be used by the bees in the queenless colony to make new queens. This process must be watched closely. The bees will start those queens within 24 hours. It only takes 16 days to make a queen. The cells need to be removed as soon as they are capped. This takes less than two weeks. The bees will make those queens over a 2 -3 day time. If one hatches, she will immediately assassinate all 10 of her rivals with help from the workers.
When the queens are cut out, do not handle the queen cells. Those queens will be easily damaged. Cut about an inch diameter piece of comb out above the new queens. Use this comb piece as a handle. It will have brood in it but …
Photo Captions
This is an old comb due for replacement that has been cut to illustrate the appearance of brood comb cut for queens.