One of my main endeavors in reconstructing American apicultural history has been to find from long ago a beekeeper’s original equipment (a beehive, smoker, honey extractor, comb foundation mill, etc.)
Concurrent with the equipment search, I am constantly hunting for old apicultural literature, particularly any explanatory literature published by the beekeepers who made any equipment I have already found. That way the original artifact can be explained as originally intended, before any changes that could obscure or confuse the original design or use.
Of course, quite often that goal is just not possible when the intervening time has gone well past a century. My search begins primarily in the 1800s and proceeds further back in time. Fortunately, I have been lucky several times.
First though, before we meet our beekeeper, the subject of this article, it is imperative to have a basic understanding of beekeeping practices of those past times, specifically for this article, the early 1880s. Langtroth’s movable frame, based on a bee space completely surrounding the comb, was becoming available from the 1850s on. Before standardized equipment, however, hives were sold in various frame sizes and shapes. Many hives, though, were not on the market for long and vanished, leaving little trace except in paper (advertisements, patents, etc.).
Full sheets of comb foundation were available. Beeswax was commonly adulterated. For foundation, the adulterated sheeted wax could not withstand brood nest temperatures during comb construction. In wired frames, the embossed sheet often sagged (Alley, 1885). Working on beekeeping projects in other countries where adulterated foundation was still a problem, I saw the foundation flopped over itself, suspended only by the wires. Adulterated foundation was expensive for impoverished beekeepers and worthless to them. (While I let the local beekeepers explain the problem to me, as an apicultural historian I knew the difficulty quite well.)
At this time (1880s) and before, frames were cut with the lower side of their top bar formed into a long triangular ridge running the length of the frame. From the triangular ridge under the top bar, the bees were supposed to build a straight comb fitting inside the frame. The cross section of the top bar was a triangle (pointing downward). Hence the old slang for the frames was “triangular frames.”
In addition to wax adulteration, a typical consumer of the time would have considered liquid honey as adulterated. Products that could be easily adulterated were rampant, like honey by mixing it with cheap sugars. In the eye of the honey buyer, the signature of purity was honey in the comb, put there by the bees. Hence, the traditional way to sell honey was in the comb.
Long before section comb honey, the honey combs were built in wooden boxes of various sizes. One a little smaller than a shoe box seems to have been typical. These boxes would have a glass window at one end (supposedly so the beekeeper could tell when the box was full and remove it). While beginning somewhat crudely, this “box honey,” which was the old slang for it, was the original forerunner of section comb honey, after a considerable size reduction (and the later invention of the super).
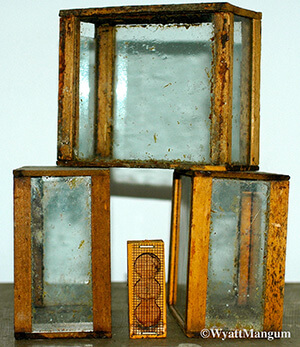
Figure 1 shows one version of a honey box, evolved to become smaller, and the small window enlarged to become four glass sides. The glass-and-wood box functioned like the honey jar of today. The customer bought them as part of the honey purchase. And like the jar, these honey boxes are difficult to find because of their disposable nature. Some bee supply catalogs of the times offered the wood and glass for more common honey box sizes, the size given by honeycomb capacity of the box (like a 2 lb. box). One honey box was so popular, it has its own name, a “Prize Box.”
While at this time beekeeping was male-dominated, women made contributions too. Mrs. Lizzie E. Cotton of West Gorham, Maine designed her Controllable Hive (see Figure 2). In 1880, she published the companion book (first edition) for the hive titled, “Beekeeping for Profit, A New System of Bee Management.” The book showed her hive and explained how to manage bees in it. (I am working from the second edition published in 1883.)
From the book, Figure 3 shows two pictures of her hive. The upper picture is the hive with its cover in place. In the lower picture, the hive has the cover removed. The glass honey boxes are on top, over the brood frames (not visible), the location of a honey super on a modern hive. Cotton also situated glass honey boxes on the sides of the hive, knowing that bees stored honey on the periphery of the brood nest.
(In the study of historical hive designs, modern vertical hive supering is only one direction to expand the volume of a hive from its brood nest. Hive volume could be expanded from the sides or even from below the brood nest.)
Figure 4 shows a rare set of specifications for building Cotton’s Controllable Hive, the honey boxes, and numerous other details about the hive. Figure 5 shows a cross-section of the hive (essentially an end view). The brood nest consisted of six frames (approximately 10 by 19 inches, similar to a standard deep brood comb). From the end of the hive, the wooden triangular comb guides (under the top bars) appear as small (shaded) triangles.
In her book, Cotton warned that when starting a colony with only these triangular comb guides (no straight combs for guiding the placement of the new combs), the bees sometimes build the new comb crosswise. Today, top-bar-hive beekeepers voice similar complaints, suffering again from that old problem of crooked combs. (From those historical difficulties, I never tried wooden comb guides when building my 200 top-bar-hive operation where straight combs are as essential as interchangeable Langstroth frames. A foundation strip, 1½ inches wide, attached under the top bar with beeswax, produces consistently straight combs.)
Typical of the time, the end bars of Cotton’s frames were narrow and straight. That simple end-bar design does not automatically space out the combs upon replacing the frames in the hive. The beekeeper had to “manually” reset the comb-to-comb spacing after inspecting the brood nest. To appreciate this point, look at Figure 6 showing another end view of the frame rest (narrow ledge) in Cotton’s hive, which includes additional measurements. See how the end bars do not touch. On modern self-spacing frames, the upper wide shoulders of the end bars (called Hoffman spacers after Julius Hoffman, their inventor) automatically space the frames.
Without the end spacers, beekeepers had to push and pry lethargic frame lugs along the narrow ledges, both hive parts sticky with propolis, until the frames were properly spaced out to appear as shown by Figure 6. (Mostly on beekeeping projects in other countries, I have inspected colonies with homemade frames that were not self-spacing. While I considered those opportunities to be historical experiences of beekeeping long past, the work definitely slows and becomes more tedious, at least initially. Frame-handling experience overcame some of the difficulty of working with such an old-style frame, but that was not better than having self-spacing ones.
For decades I have been searching for anything by Cotton. After nine years of negotiating, I was finally able to purchase an original miniature-size Cotton Controllable Hive. That little hive is extraordinarily rare. (And yes, you read that correctly –– nine years, and I was prepared to siege it out for more years, whatever it took.) The miniature hive was probably used for selling the larger hive. Usually a salesperson or agent sold the hive using the more portable smaller model. However, Cotton said she never had agents, so who used it is unknown. It could have been her or someone who copied and sold her hive design. (Cotton did complain about counterfeits of her hives.)
Figure 7 shows the miniature hive with its cover on as a full-size hive would appear in the apiary. If the hive had all its honey boxes installed or not, it would appear the same as this one. Besides being designed in a time before vertical honey supering, a hive designed solely for comb honey production, whether in a main nectar flow or not, appeared the same. These historical apiaries appear much more uniform too, as shown by Figure 8.
Figure 9 shows the miniature hive with its cover off. Unfortunately, all of the glass honey boxes were missing, except luckily for one (arrow). In the diagram in Figure 5, the box frames have screw eyes, metal loops, functioning as handles to lift out the box frames from the hive body. As in the lower picture in Figure 3, additional glass honey boxes went over the brood frames. The volume capacity around the brood nest could hold about 100 lbs. in honey, which could be divided up in honey box sizes (capacity) ranging from one to four pounds. Figure 10 shows the triangular frames.
A hive’s design cannot be fully understood without learning the way the beekeeper originally meant to manage the bees in the hive. Knowing her hive, here are a few highlights from her book. By the beginning of the main nectar flow, Cotton’s spring management sought to grow the colony so the bees covered all the brood frames by feeding the colony with her special syrup feeder situated on top of the frames. Cotton described early spring feeding to produce early swarming to increase hive numbers. (The bees were confined to the six brood frames.) Increasing hive numbers by swarming was an old method before Langstroth’s frame in America, which dated back to European skep beekeeping. Increasing by swarming would have been familiar and acceptable to beekeeper customers buying her book and hives.
The colonies recovered their bee populations and filled their brood nests with syrup. (With a brood nest so small by our standards, more typical by theirs, this early swarming and recovery was feasible.) Then Cotton gave the bees access to the ….


