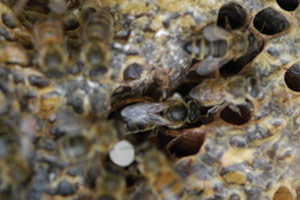
Marking a queen with a dot of paint on her thorax is important in several ways. Queen marking makes the queen easier to find in a colony, particularly in a large populous colony, and sometimes when a queen hides (see Figure 1). The color code indicates the birth year of the queen (see below). When an unmarked queen appears in the colony, the beekeeper knows queen replacement has occurred, which could be one of the “big four”: usurpation, swarming, supersedure, or sudden death of the former queen.
Usurpation is the lesser known of the four. With usurpation a summer swarm (not a reproductive swarm in the spring) enters an established colony and kills its mother queen. The usurpation queen of the swarm becomes the colony’s queen. The colony take-over can occur quickly, effectively in a day or two. That means an unmarked queen replaces the colony’s marked queen, without any queen cell construction, leaving the uninformed beekeeper bewildered.
Queen marking also has more special applications. In areas with Africanized bees, marked queens of European stock indicate a continued presence of that gentle bloodline. Marked breeder queens indicate no change in the original queen stock when grafting from them, for example by supersedure or usurpation.
Below I describe my queen-marking method in detail. It seems like a lot to get started, but it is not really. Rather it relies on simple items and common sense. To mark queens, my method accomplishes two main goals. First, it dispenses only the correct amount of paint near a valuable queen, eliminating the possibility of dripping too much paint on her. Second, I use a hand technique that improves my aim so the paint dot marks her perfectly in the center of the queen’s thorax.
I use Testors model paint in the bottle size as shown in Figure 2. These paints come in numerous colors, but I recommend the standard colors denoting the last digit of the queen’s first season (white 1&6, Yellow 2&7, red 3&8, green 4&9, blue 5&0). The hobby community uses these paints for numerous projects, and the internet has them for sale in various lot sizes too. (The internet may be a good way to acquire extra caps too; see below.) When I was a kid, this was the paint for marking queens. The problem was how to apply it safely on a queen without painting her eyes or the base of her wings (see Figure 3), or having the paint run down into the connection between her thorax and abdomen.
Figure 2 shows the modified bottle cap for marking a queen. In the center of the metal cap, I drilled a 3/32 of an inch size hole (3/32 inch=0.09375 inch=0.23813 cm). Most importantly, drill the hole without bending the cap. The goal is to have a near perfect circular hole in the flat unbent cap. I tried puncturing a hole. Puncturing makes a hole but it bends the cap, forming a distorted hole that is not circular enough. The edges of the hole scrape clear the excess paint, leaving only the correct amount for marking the queen on the blunt end of the modified nail (see below).
Drilling a hole in the cap can be awkward because the cap is small compared to the large drill above it. The cap needs to be held still during the drilling too. Use pliers or maybe a vise to hold the cap still, but be careful not to bend it. Drill through the cardboard liner too, inside the …