
One of the things I love most about beekeeping is the intrigue, the mystery. Studies show that it is not the finding of a treasure that provides happiness, it is the seeking. We beekeepers should be eternally happy, in that case, because we will always be seeking answers. On the other hand, one of the most frustrating things about beekeeping is seeking and not finding any answers. It is heart-breaking enough to lose a colony, but when it is impossible to learn from your mistakes because you don’t know what mistakes you made, it is enough to drive you crazy. Another reason it is so important to be able to diagnose a dead-out is so that you know whether you can use the old equipment, and especially the old comb, for the next colony. I will walk you step by step through my method of diagnosing a dead hive.
Step one: Examine the Outside
Just like when the colony is alive, the first place to look for clues as to what is going on inside is at the entrance of the hive. Is there a whole pile of dead bees? No dead bees at all? Little white mummies? A snowdrift of beeswax dust? If you discover a dead-out soon after it occurs, a whole pile of dead bees might make you wonder about pesticide poisoning. A live colony should have a few dead bees out front because the undertakers are doing their job. Little white mummies would indicate chalkbrood, a springtime disease. A dead-out that you discover in the late winter will probably have none of these things, but examining the entrance is a good habit to get into. The clues you find at the entrance will be critical for diagnosing a dead hive any time other than early spring.
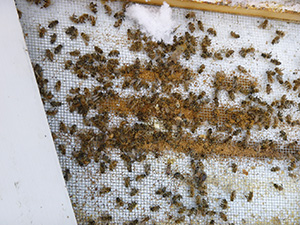
Step Two: Examine the Bottom Board
If possible, remove the hive bodies from the bottom board without separating them from one another. The reason for this is that if you break up the cluster of dead bees, they will fall onto the bottom board. It’s this thing called gravity that operates even inside bee hives. The fallen bees will obstruct your view of whatever is on the bottom board, and keep you from knowing how many bees were there from whatever happened prior to your digging around. You might see a mountain of hive beetles piled up in the corner. You might see that a lot of bees fell out of the cluster onto the floor. This happens when the cluster is too small, and the bees on the outside of it become paralyzed by the cold and fall. There may be almost no bees on the bottom board, but huge piles of wax fluff that is a result of a colony being robbed. You may find the bottom board almost solid red with little mite bodies. Also pay attention to the location of the pile of dead bees. If they are all against the sunny side of the hive, whether that is the south or west, you now have a clue about how they were handling the cold. The floor is also where you might find a dead mouse, or mouse nest. I have never seen a mouse kill a bee colony, though they can eat a lot of the honey and comb and cause the death of the colony by starvation.
Step Three: Look at the inner cover and tops of frames:
If the inner cover is soaking wet and black with mold or fungus, and directly below this is the soggy, moldy cluster, the bees may have died because of the condensation dripping onto the cluster. Wet bees are dead bees. Mold on the cluster alone does not necessarily mean that it was lack of ventilation that killed the bees. If the bees died early in the winter from any cause, the cluster will probably be moldy, and the bees mushy and black. Look for evidence of too much moisture around the hive and around the cluster.
Step Four: Examine the Cluster
Is there a cluster of dead bees between the combs? Sometimes there will be a small cluster, but also individual bees frozen in place on the comb away from the cluster. This is a tragedy that you can feel better about. Sometimes, a nice warm afternoon allows the bees out of the cluster to ….