A split is simply a division made by taking an existing colony and separating it into two or more parts. As elementary as that sounds, endless variations exist depending on the desired outcome. Splits can create more colonies, produce nucs, raise queens, prevent swarms, or control mites.
An experienced beekeeper will often have a signature split, one he’s used successfully over the years. Often these specialized splits come with colorful or descriptive names. A quick Google search reveals vertical splits, overnight splits, and Mississippi splits, in addition to cut-down, walkaway, and swarm-control splits.
Most of the splits with fanciful names are minor variations on a theme, so the one you choose depends on your preference, timing, or the equipment you have available. When I first tried a Taranov board, I needed to split my one top-bar hive into a Langstroth hive, so moving frames was not an option. In addition, the bees were ready to rumble: Swarm cells hung like icicles from the sides of the combs, and the bees were antsy, climbing the walls, flying but not foraging. I needed to create an artificial swarm pronto.
Mr. Taranov and his board
In 1947, G.F. Taranov, a Russian beekeeper, believed that swarms comprised very young nurse bees that hadn’t yet secreted brood food or wax (something we now know is not quite true). He supposed that the youngsters conserved all their energy for founding a new colony from scratch and, because they had never taken orientation flights, they wouldn’t know their way home.
Taranov believed that if he could separate the experienced foragers from the inexperienced nurse bees — that is, the old bees from the young bees — he could start a new colony and prevent a swarm. The problem, of course, was how to separate bees by age.
Ultimately, he decided to remove all the bees from their hive and provide a barrier to re-entry. He wanted a barrier that the old bees would easily cross but which would befuddle the young ‘uns, thereby separating them into two groups. The barrier he chose was a four-inch-wide strip of thin air.
It’s not the vodka
Honestly, I try to be fair when assessing my fellow human beings, but when I read about a four-inch swath of air designed to barricade bees from their front door, I lost it. “They’re bees!” I exclaimed. “They have wings!” Taranov’s idea simply defies logic.
I thought perhaps that too many sub-zero nights near the Arctic Circle had necessitated a little extra vodka, so maybe this man Taranov was a wee bit tipsy?
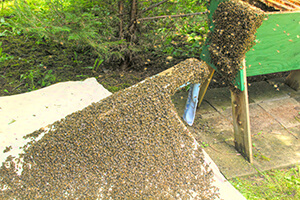
But now, having seen thousands of young bees creep up to the edge of the precipice, peer across the divide, and decide against further action, I know Mr. Taranov was a genius. Each time I witness it anew, I think it’s something every beekeeper should see at least once in his lifetime. So, let’s take a closer look at his miraculous device.
The shape of a Taranov board
Basically, a Taranov board is a ramp that slopes from the ground in front of the hive up to the hive entrance. The ramp should be roughly the same width as the hive entrance, and the slope should be about 45 degrees.
The slope is more important than the length of the board, which means you need to vary the length depending on how high the hive entrance is from the ground. The Taranov system only works for hives that are above ground level because you need a considerable amount of space below the ramp for the bees to congregate. You’ll see what I mean in a moment.
You need to support the top end of the ramp — the part nearest the entrance — with legs of some sort, but the low end rests on the ground. On the underside of the ramp, two-to-three inches from the top end, affix a piece of burlap, scrap carpeting, or a terry-cloth towel. Whatever you choose should be easy for the bees to grasp, because this is where the cluster of young bees will form.
If possible, it’s better to assemble the Taranov board before you need it because it can be a scramble to get it all together, especially when your bees are acting swarmy. The tricky part — the legs — need to be the proper length but strong enough to hold the ramp steady so it doesn’t tip over. And remember, even a half-colony of bees is heavy.
The great divide
After you complete your ramp, pull it away from the hive entrance until you have a space about four inches (10 cm) wide between the ramp and the landing board. This is what I call “the great divide,” the barrier that keeps young nurse bees from crawling back inside their hive.
Next, cover the entire area with a large light-colored sheet. Drape the sheet over the ramp, covering at least the lower two-thirds and stretching it out to either side, making a smooth, wrinkle-free surface. Fasten the sheet to the board with staples so the sheet doesn’t slide down under the weight of bees, and place rocks or boards around the edges to keep the wind at bay.
The sheet keeps the bees clearly visible so you can avoid stepping on them, and it prevents the bees from getting lost or tangled in the grass. Now you’re ready to proceed.
How to split your bees
With any luck, your bees didn’t swarm while you were preparing, so now you can begin your split. One by one, remove each frame or top bar and shake it over the sheet. It’s best to shake in a quick but gentle up and down motion to avoid tearing delicate combs or displacing larvae. After the bees land on the sheet, any foragers will quickly fly away, but the nurses stay in place, often huddling in small groups.
If you come to a frame with queen cells, do not shake it. Instead, gently brush as many bees as possible from the combs with soft upward strokes of a bee brush. Do not stroke the brush downward because the upward slope of the cells can entangle and damage delicate legs.
After shaking, check the frame for the queen. If possible, you want the old queen on the sheet with the nurses. If you happen to see her, you can ….


