Backyard beekeepers can take the time to watch their bees and learn a lot in the process. You can take classes, read books, & watch all the YouTube videos in the world, but ultimately the bees are the best teachers. When you document your hive over time, you can see how the colony develops and what behaviors the bees engage in at each time of the year. Tracking the location and size of the brood nest is of particular interest, as you can see the colony grow and shrink in response to food supply and hours of daylight.
Building up this detailed type of information over a couple years helps a beekeeper learn to work with the colony’s natural instincts. The beekeeper will more intuitively know when to move frames or boxes around to help the colony grow and thrive. Records help me learn to anticipate what the bees will do next, instead of being surprised and frustrated.
When I started taking notes on my hives, I immediately started drawing pictures rather than writing a bunch of words. It takes time to read over notes. It takes a quick glance at one of my drawings just before I inspect, to know exactly what I need to do.
The Basics
Let’s go through some basic drawings to give you inspirations for your own! Below is a basic drawing of the nuc I started May 20th this year, when I moved to Minneapolis. They are Carniolan bees with the Minnesota Hygienic trait. The hive is named Bled after a town located in Carniola, now Slovenia, where part of my ancestors come from.
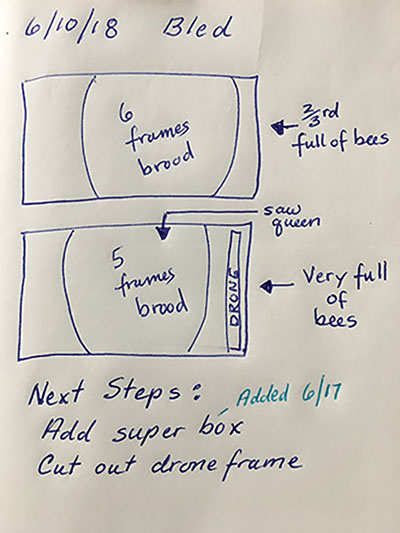
By June 10th, the colony had grown substantially. As you can see, at the top I put the date of the inspection (6/10/18) and the hive name (Bled). If your hive can be defensive, you may also want to the add the time of the inspection and the approximate temperature and weather to track if that has any bearing on their defensiveness.
Next, I draw the brood nest. It is so important to know exactly where the brood nest is located. There are so many reasons: you know where to look for larvae and eggs to confirm you have a laying queen, you can make sure there are enough empty frames for the queen to expand her broodnest so the hive doesn’t swarm, it makes it easy to find a brood frame to test for mites with the sugar or alcohol roll, and if you need to do a mite treatment, you know the correct place to apply Mite Away Quick Strips to make it effective. If I notate frames of brood, it assumes that I saw eggs and larvae. If I only saw capped brood, I would label the brood “only capped brood.”
I make a couple notes under “Next Steps.” A couple days before I inspect, I look at these next steps, so I have time to get the equipment ready to carry them out.
On the right is the same hive on 7/5/18 with honey boxes.
My quick notation is:
H = honey or nectar
P = pollen
B = brood
For example, if we look at the second box from the bottom, we can read it from the left: a brood frame (surprise!), a honey frame, 6 frames of brood where I also spotted the queen, a drone frame, and a honey frame.
I am planning on making a nuc from this colony, so I marked where the food supplies like pollen and honey were located. This will let me find them quickly next time, so I can put them in the nuc.
I don’t usually use a queen excluder, so they do have one brood frame up in the super, like a rebellious teenager. I don’t mind as they usually stop putting brood up there when they start shrinking their broodnest. Having a brood frame up high can be advantageous as it allows me to do a super quick inspection by just looking at this frame. If it has larvae or eggs on it, I know my queen’s likely still alive. I can then sugar roll test from this frame and close the hive back up, without looking at anything else. Since I’ve noted exactly where the frame is in the hive, the inspection is super fast and to the point.
When I inspect, I am focused on 4 things (listed below). These four things are going to show up in my drawings in the following ways.
1 Larvae/eggs – to verify there is a laying queen.
Drawings: if brood listed, then this assumes I saw eggs/larvae
2 Hive Size – Assessing whether the size of the woodenware matches the population of bees. This lets me assess when I need to add boxes, because the hive is growing or take off boxes when the population shrinks in late summer or early fall.
Drawings: I will note if the hive looks very full. Under next steps, I will say to add or subtract a box.
3 Varroa mite level – I test regularly using the sugar roll.
Drawings: I write the mite level up on top. It is always per 300 bees (my actual result of the sugar roll test).
4 Food supply – do they have enough pollen and honey in the hive?
Drawings: I can see how much honey they have. I make a note if the larvae look dry, indicating there is a shortage of pollen.
Pictures are really great for when you do splits. You can just draw arrows of which boxes went where. Below is an example with the nuc I made, but just showing arrows with frames as it was a small split. The original inspection on July 5th is in one color (purple). I use a second color (pink) to indicate what I used to make the nuc on July 11th. With a glance you can see the difference and exactly what type of manipulation I did.
What Qualifies as a Brood Frame?
I teach beekeepers and a few of my bee apprentices got very detailed about what was on a frame. I would ask
….