
When I kept bees in the 1970s, 125 hives along the James River west from Richmond, Virginia in several apiaries for about 40 miles, the spring wildflower, mostly tulip poplar, made dark honey. A polariscope seemed exotic, and I did not know how it worked. I made honey by the ton, but demand was weak back then. I sold some of it for a dollar for a one-pound jar.
Eventually I sold my hives to partly finance college, earning a B.S. in physics from Virginia Tech, where I learned about the exotic nature of light. Visually stunning, a career in lasers could have swept me away from bees, but I loved them too much. During my graduate studies (M.S. applied mathematics, Ph.D. genetics), I worked at North Carolina State University in the bee research program.
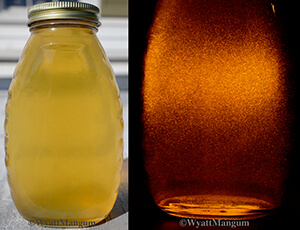
One of my duties was to judge honey, either alone or with others, at various county fairs, state fairs, state beekeeping meetings, and the Eastern Apicultural Society (EAS). The main tools of the honey judge are the polariscope, for seeing inside a jar of honey, and a refractometer for measuring moisture content. I used a polariscope made from the plans shown in Figure 1, and I considered it indispensable for a honey producer. As we will see, the polariscope reveals so much of what is in the honey, hidden by low-level white glare coming through the jar (see Figure 2).
I found it difficult finding the time to build a polariscope of my own. All that changed at a state bee meeting where I was invited to speak. A beekeeper whom I had never met before offered to sell me his polariscope. The polariscope was made to the plans just shown, but from walnut, a real piece of carpentry art. My reservation was that he was not satisfied with its results. A problem with the filters, I figured, given their abstract nature. His reservation was that I did not have his cash price in my pocket, ready to hand over. Soon, though, he trusted me to mail him a check, and I bought his beautiful, though probably broken, polariscope.
Back home, I removed his filters. Not surprisingly they were only grey filters that did not polarize the light at all. They did nothing, except dim the light. Holding a grey filter by a linear polarizing filter, it is hard to tell the two apart. Do not be lured into thinking not much could be happening here. The light and especially polarizing filters are the heart of the device. One needs to understand how they function or at least to orient them (cross them) so the polariscope works properly (see below).
The polariscope I bought used the old 75- or 100-watt incandescent bulb, which gives off intense heat (wasted energy that does not produce light). When used repeatedly judging honey for hours, a polariscope heating could possibly damage the closer filter. Besides, I just never liked all the heat confined in a wooden box, even with the ventilation holes.
When more energy-efficient mercury bulbs became available, I did not want to use one in my polariscope. The device is too mobile, and dropping it might break the glass tubing or bulb, depending on the design. In general, breaking those bulbs requires a tedious cleanup because mercury is a poison.
On the other hand, I have been using the equivalent of a 100-watt LED bulb. It puts out plenty of light, runs cool, and I cannot foresee it damaging the first filter. (LED is an abbreviation for light-emitting diode, a component from electronics. I saw my first LED in the early 1980s in a physics lab as an unimpressive small light that only came in one color, white. Our physics professor said LEDs were extremely energy efficient, lasted much longer than old hot bulbs, and would be the light of the future, a prediction that has come true.)
Figure 3 shows my polariscope with the equivalent of a 100-watt LED bulb, an early large one. For a closer study of impurities in honey, including obtaining photographs, I wanted a brighter, more spread-out light source. With smaller LED bulbs produced later, I managed to fit two 100-watt-equivalent ones in the polariscope, adjusting the light socket, positioning them by trial-and-error until they accommodated the bulbs with space around them for rotation (for removal and replacement).
Figure 4 shows the polariscope with two bulbs. I am not saying two bulbs are necessary, and my modifications are subject to change given any upcoming bulb designs. Overall within reasonable limits, I am seeking a bright spread-out light field to illuminate a honey jar without dark places (which are typically near the bottom of the device).
With two bulbs (or more) in the polariscope, we meet a new problem with this device, yet one well known in wiring circuits. How to connect the bulbs with the wires? The two basic ways to connect the bulbs in the circuit are “in series” or “in parallel.” If these terms, series and parallel, are not familiar to you (for wiring) find someone competent in wiring, perhaps a beekeeper in your local club, and have him or her help you.
Briefly, without going into the wiring diagrams of the bulbs, they should be wired in parallel. That way if one bulb fails, the other bulb stays lit. Here obviously you know which bulb failed, the unlit one.
If the bulbs are connected in series and one bulb fails, both bulbs go dark. Now you cannot tell which bulb is faulty (without some testing) because both are dark. The two-bulb polariscope problem is a simplified version of the old string of Christmas tree lights problem, say for example one with 30 screw-in little bulbs. The bulbs of the old antique ones were wired in series. If one bulb failed, all the working lights went out, effectively hiding the burnt-out one. How to get all the lights working again? If the broken one was replaced by a working bulb, all the lights would light up again.
With a known working bulb someone had to remove each bulb one at a time, replace it with the test bulb, see if the string lit up. If not, replace the original bulb and repeat the test on the next bulb. This tedious testing continued until the string of little bulbs lit up. That removed bulb was the faulty one, having the burnt-out filament that broke the overall current flow, turning off all the lights. If the bulbs were connected in parallel, then only the failed bulb would go dark, eliminating all that testing, as with modern lights. By the way, series connections have their strategic uses. For example, the bulbs, as a group, are connected in series to the switch on the side of the polariscope. Turning the switch off breaks the current flow, like the burnt-out bulb in the old Christmas lights, and in both cases, stops the electric current from flowing.
The polarizing filters are both a bit strange while being the essence of the polariscope. One-way light can be understood as similar to water waves coming to a beach (before they break on the shore). There are two basic motions: the up-and-down wave motion (vertical vibration) and the horizontal transverse motion, the wave moving to the beach. This wave motion is like light vibrating in the vertical plane while moving horizontally. Light coming from the bulb in the polariscope is unpolarized because the light waves vibrate in all directions equally (vertical to horizontal and all directions in between). For polarized light, some direction of vibration has more light waves vibrating in that direction and less in the other directions.
After going through the first polarizing filter, the light vibrates in only one direction. It will be either the vertical or horizontal direction. Let’s say it’s the vertical direction, like the water waves. The second filter only allows ….